
Overview
Typescript를 적용하고 null able로 인한 고통을 쉽게 줄일 수 있었습니다. 그리고 Saga를 적용하여 중복 액션에 대한 비동기 처리를 쉽게 해결하였습니다.
위 두 가지를 적용하고 개발의 질도 올라갔고 (특히 typescript를 적용하고) 원래 javascript는 이랬어야 하지~ 라고 느낍니다.
이번 포스트에서는 어떤 이유로 위 두 가지를 적용했는지를 말하기보다는 실제 React+Typescript에 어떻게 redux와 redux-saga를 적용하고 사용할 수 있는지를 말하려고 합니다.
이 포스트는 Redux를 사용해 보셨고 Saga를 처음 접해보시는 분들께 도움이 됩니다.
Install
이 포스트에서는 CRA에 Typescript 설치를 진행하겠습니다.
node version : 12.13.1
$ yarn create react-app test-app --template typescript
$ yarn add redux react-redux @types/react-redux redux-saga
redux-actions와 같은 Typescript 용 라이브러리입니다.
액션 생성 함수와 Reducer를 더 편하게 작성하고 사용할 수 있습니다.
$ yarn add typesafe-actions
Usage
1. 리덕스 모듈 구조 잡기
개발 방법론을 설명하려고 하지 않았지만, 그보단 덜 무거운 주제인 Redux 디렉터리 구조를 같이 소개하려고 합니다.
타입스크립트를 사용하기 전에는 완전한 덕스패턴을 이용하고 있었습니다. 하나의 파일에 액션 생성 함수, 리듀서 등을 같이 정의했으나 Typescript를 사용함으로써 생기는 state의 타입 선언 등 코드가 상당히 길어지는 불편함이 있었습니다.

300줄이나 되는 하나의 모듈 코드
위 모듈은 크게 보면 액션생성함수가 5개밖에 되지 않고 타입 선언이 빠져있음에도 300줄이나 되는 모습을 보입니다. 새로운 함수가 추가될 수록 코드의 길이는 기하급수적으로 길어지고 늘어나는 스크롤 속에서 원하는 코드를 찾는 작업은 점점 힘들어질 수 밖에 없습니다.
위의 구조를 해결하기 위해 디렉터리 구조 변경과 vs code의 장점을 이용하여 해결할 수 있습니다.
아래 구조는 벨로퍼트님의 강의를 참고하였습니다. 참고 : https://react.vlpt.us/
.
├── actions.ts
├── index.ts
├── reducer.ts
├── saga.ts
└── types.ts
하나의 모듈 파일을 위와 같이 분리하는 것으로 간단하게 해결할 수 있습니다. 파일명만 봐도 모듈에서 어떤 것을 정의하고 있는지 감이 오실 겁니다. 하나씩 어떻게 작성하고 있는지 설명하겠습니다.
2. 리덕스 모듈 작성하기
리덕스 모듈을 작성하기에 앞서 VS Code를 사용해서 작성하면 더 좋습니다. 번역 시간에 대한 에러(컴파일 에러)를 어느 정도 미리 잡아줍니다. 그리고 CommonJS나 AMD로 정의된 각 모듈을 파일 여러 곳에서 사용하기 때문에 여러 파일을 탐색하면서 수정하게 되는데 이때 맥기준으로 cmd+import한 모듈 명을 좌클릭하면 바로 모듈이 정의된 파일로 이동하게 됩니다.
정의된 모듈을 사용하는 경우 정의된 모듈 파일로 바로 이동할 수 있다.
무엇보다 Typescript를 사용하는 React에서 props로 전달받는 데이터에 대한 검사도 컴파일 이전에 잡을 수 있습니다.
2. 0. 리덕스 스토어 작성
모듈들을 적용할 루트 리듀서를 작성해야 합니다. test 모듈은 아래 예제에서 작성하게 될 모듈입니다.
modules / index.ts
import { combineReducers } from "redux";

import test from "./test";

const rootReducer = combineReducers({
  test,
});

export default rootReducer;

//컴포넌트에서 사용하게될 스토어에 저장된 데이터의 타입입니다.
export type RootState = ReturnType<typeof rootReducer>;
이후에 미들웨어를 편하게 등록시키기 위해 configureStore.ts를 미리 만들어 둡니다.
modules / configureStore.ts
import { createStore } from "redux";
import rootReducer from ".";

export default function configureStore() {
  const store = createStore(rootReducer);

  return store;
}
이제 프로젝트에 적용하면 됩니다.
import React from "react";
import ReactDOM from "react-dom";
import { Provider } from "react-redux";

import configureStore from "./modules/configureStore";
import App from "./containers/App";

const store = configureStore();

ReactDOM.render(
  <Provider store={store}>
    <App />
  </Provider>,
  document.getElementById("root")
);
2. 1. actions.ts
modules / test / actions.ts
import { createAction } from "typesafe-actions";

//액션 타입
export const SET_STRING_ARR = "test/SET_STRING_ARR" as const;
export const SET_OBJECT = "test/SET_OBJECT" as const;

//액션 생성 함수
export const setStringArr = createAction(SET_STRING_ARR)<string[]>();
export const setObject = createAction(SET_OBJECT)<{
  a: string[];
  b: number;
  c: string;
}>();
액션 타입을 선언하고 액션 생성함수는 ‘typesafe-actions’의 createAction모듈을 사용합니다. createAction은 무제한으로 인수를 받을 수 있습니다.
2. 2. types.ts
store에 저장될 데이터의 타입과 액션 생성함수에 대한 타입을 정의합니다.
modules / test / types.ts
import { ActionType } from "typesafe-actions";

import * as actions from "./actions";

export type testState = {
  testStringArrData: string[];
  testObjectData: { a: string[]; b: number; c: string };
};

export type testAction = ActionType<typeof actions>;
ActionType 모듈은 선언된 액션 생성 함수의 타입을 정의해줍니다. 새로운 액션 생성함수를 만들어도 새롭게 타입을 정의하지 않아도 됩니다.
2. 3. reducer.ts
modules / test / reducer.ts
import { createReducer } from "typesafe-actions";

import { testAction, testState } from "./types";
import { SET_STRING_ARR, SET_OBJECT } from "./actions";

const initialState: uxAnalyticsState = {
  testStringArrData: [],
  testObjectData: {
    a: [],
    b: 0,
    c: "",
  },
};

//createReducer는 reducer를 쉽게 작성할 수 있도록 하는 모듈이며
//타입 오류를 방지 할 수 있습니다.
const reducer = createReducer<testState, testAction>(initialState, {
  [SET_STRING_ARR]: (state, action) => ({
    ...state,
    testStringArrData: action.payload,
  }),
  [SET_OBJECT]: (state, action) => ({
    ...state,
    testObjectData: action.payload,
  }),
});

export default reducer;
‘typesafe-actions’ 혹은 자바스크립트에서 ‘redux-actions’를 사용할 때는 reducer를 객체 형태로 작성할 수 있어 switch 문으로 작성하는 것보다 가독성이 좋다고 생각하고 있습니다. 그리고 VS code에서는 액션 생성 함수의 타입과 store의 타입에서 정의된 형식의 데이터만 코드로 작성할 수 있기 때문에 자바스크립트를 쓸 때 보다 더 null-able과 정의되지 않는 데이터 오류에 대한 고민을 많이 줄 일 수 있습니다.
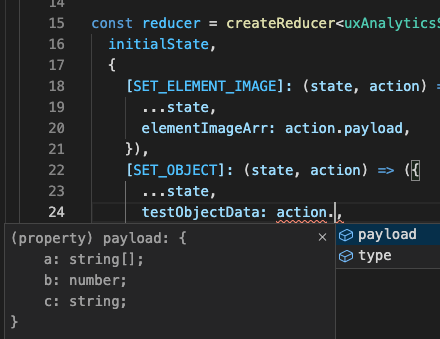
Ctrl + Space 단축키로 action 인자에 정의된 객체를 탐색할 수 있다.
2. 4. index.ts
modules / test / index.ts
export { default } from "./reducer";
export * from "./actions";
export * from "./types";
어렵지 않습니다. 리덕스 스토어에 등록하기 위해 지금까지 작성했던 export 가능한 모듈들을 전부 불러와 export 합니다.
3. Redux-Saga 적용하기
가장 중요한 비동기 로직을 적용하는 방법입니다. 보통 프로젝트에서 비동기 로직을 구현할 때 대부분 API 처리에 관해 로직을 구현하게 됩니다. 그러한 관점에서 Saga를 어떻게 작성하는지 알아보겠습니다.
3. 0. api.ts, type.ts
api의 파라미터 타입과 리스폰스 타입을 정의합니다.
api / test / type.ts
// type.ts

// 세션 유효성 체크
export interface GetCheckSessionPramType {
  id: string;
}
export interface GetCheckSessionResponseType {
  code: string;
  message: string;
  payload: any;
}
api에 관한 정의를 작성합니다. axios 모듈로 작성하였습니다.
api / test / api.ts
//api.ts

import axios from "axios";
import { GetCheckSessionPramType, GetCheckSessionResponseType } from "./type";
import config from "../config-api.json";

let { apiInfo } = config;

export async function apiGetCheckSession(info: GetCheckSessionPramType) {
  const response = await axios.get<GetCheckSessionResponseType>(
    `${apiInfo.api_url}/check_session/`,
    {
      withCredentials: true,
      timeout: 10000,
      params: {
        id: info.id,
      },
    }
  );

  return response.data;
}
3. 1. action.ts
modules / test / actions.ts
import { createAsyncAction } from 'typesafe-actions';
import { AxiosError } from 'axios';

import {
	GetCheckSessionPramType
  GetCheckSessionResponseType,
} from '../../api/test/type';

//액션 타입
export const SET_STRING_ARR = 'test/SET_STRING_ARR' as const;
export const SET_OBJECT = 'test/SET_OBJECT' as const;

//액션 생성 함수
export const setStringArr = createAction(SET_STRING_ARR)<string[]>();
export const setObject = createAction(SET_OBJECT)<{
  a: string[];
  b: number;
  c: string;
}>();

//비동기 액션 타입
export const GET_CHECK_SESSION = 'test/GET_CHECK_SESSION' as const;
export const GET_CHECK_SESSION_SUCCESS = 'test/GET_CHECK_SESSION_SUCCESS' as const;
export const GET_CHECK_SESSION_ERROR = 'test/GET_CHECK_SESSION_ERROR' as const;

//비동기 액션 생성 함수
export const getCheckSessionAsync = createAsyncAction(
  GET_CHECK_SESSION,
  GET_CHECK_SESSION_SUCCESS,
  GET_CHECK_SESSION_ERROR
)<GetCheckSessionPramType, GetCheckSessionResponseType, AxiosError>();
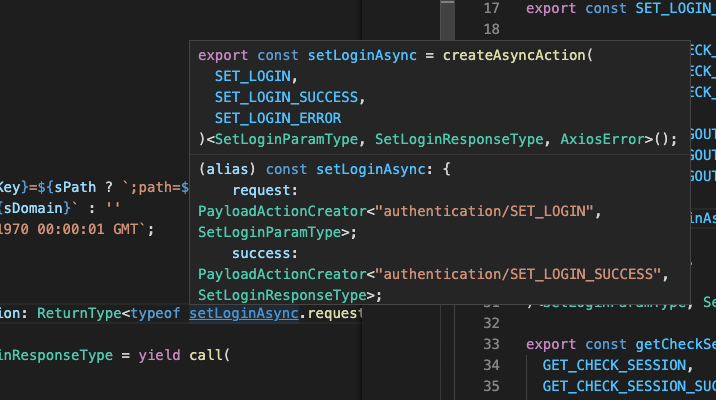
‘typesafe-actions’의 createAsyncAction 모듈은 비동기 흐름(요청 / 성공 / 실패) 처리를 단순화하기 위해 세 가지로 구분된 액션 생성 함수를 포함하는 개체를 생성합니다. 각 액션 생성 함수의 리턴 타입을 정의합니다.
3. 2. saga.ts
action.ts와 같은 디렉터리 위치에서 파일을 작성합니다. 비동기 로직을 작성하는 부분입니다. 위에 작성한 액션 생성 함수가 시작되면 아래의 Saga 로직이 실행되는 구조입니다.
아래 코드를 작성하기 앞서 Redux-Saga에서 말하는 Saga는 제너레이터 함수 이기 때문에 자바스크립트 제너레이터에 대해 이해하고 있어야 로직이 어떻게 동작하는지 이해가 가능합니다.
modules / test / saga.ts
import { call, put, takeLatest } from "redux-saga/effects";
import { apiGetCheckSession } from "../../api/test/api";
import { GetCheckSessionResponseType } from "../../api/test/type";
import { getCheckSessionAsync, GET_CHECK_SESSION } from "./actions";

function* getCheckSessionSaga(
  action: ReturnType<typeof getCheckSessionAsync.request>
) {
  //액션을 모니터링 하고 있고 특정 액션 발생 시 요청 액션 생성 함수에 대해 파라미터로 받아 올 수 있습니다.
  try {
    //해당 액션의 payload 값을 인자로 넣어줄 수 있습니다.
    const response: GetCheckSessionResponseType = yield call(
      apiGetCheckSession,
      action.payload
    );
    //actions.ts에서 선언한 비동기 처리를 위한 액션 생성함수를 각 특성에 맞게 디스패칭 합니다.
    //당연히 디스패치를 할 때 넣어줄 인자는 actions.ts에서 정의한 성공, 실패에 대한 타입이 일치해야 합니다.
    yield put(getCheckSessionAsync.success(response));
  } catch (error) {
    yield put(getCheckSessionAsync.failure(error));
  }
}

export function* testSaga() {
  yield takeLatest(GET_CHECK_SESSION, getCheckSessionSaga);
}

export { testSaga as default };
제너레이터 함수에서 비동기로 특정 함수를 실행해야 할 때 제너레이터를 사용하지 않고 쉽게 사용할 수 있는 것이 saga의 이펙트입니다.
각 이펙트의 특성에 따라 특정 조건을 만족하게 되면 제너레이터의 메서드인 next()를 실행합니다.
모듈별 특정 조건은 다음과 같습니다. (코드에 포함된 이펙트 모듈도 있고 없는 모듈도 있으니 잘 참고 하시길 바랍니다.)
call 모듈은 동기 실행을 하며 Promise를 반환하는 함수를 호출합니다. 첫 번째 파라미터는 Promise를 반환하는 함수, 두 번째 파라미터는 해당 함수에 넣을 인수입니다.fork 모듈은 비동기 실행을 하고 call과 같은 기능을 합니다.put은 dispatch와 동일한 기능을 합니다.takeEvery은 호출되는 모든 액션에 대해 수신합니다.takeLatest은 A라는 액션이 종료되지 않은 상태일 때 같은 액션이 요청된다면 현재 실행 중인 액션을 취소합니다. 그리고 새롭게 들어온 A 액션에 대해 처리합니다.takeLeading은 A라는 액션이 완료될 때까지 같은 액션 호출을 차단합니다.
3. 3. index.ts
modules / test / index.ts
export { default } from "./reducer";
export * from "./actions";
export * from "./types";
//test 모듈에 대한 saga역시 export합니다.
export * from "./saga";
3. 4. 미들웨어 등록하기
modules / index.ts
//index.ts
import { combineReducers } from "redux";
import { all } from "redux-saga/effects";

import test, { testSaga } from "./test";

const rootReducer = combineReducers({
  test,
});

export default rootReducer;
export type RootState = ReturnType<typeof rootReducer>;
export function* rootSaga() {
  yield all([testSaga()]);
}
all은 미들웨어가 여러 이펙트를 병렬로 실행하고 모두 완료될 때까지 기다리도록 지시하는 이펙트입니다.
modules / configureStore.ts
import { createStore, applyMiddleware } from "redux";
import createSagaMiddleware from "redux-saga";
import { BrowserHistory, State } from "history";
import { composeWithDevTools } from "redux-devtools-extension";
import rootReducer, { rootSaga } from ".";

export default function configureStore(customHistory: BrowserHistory<State>) {
  const sagaMiddleware = createSagaMiddleware({
    context: {
      history: customHistory,
    },
  });

  const store = createStore(
    rootReducer,
    composeWithDevTools(applyMiddleware(sagaMiddleware))
  );

  //이제 선언한 모든 Saga를 미들웨어에 등록하고 미들웨어는 계속해서 액션을 감지한다.
  sagaMiddleware.run(rootSaga);

  return store;
}
history 객체와 redux 개발자도구도 같이 적용해 줍니다. (옵션이에요)
4. 컨테이너에서 사용하기
이제 거의 다 왔습니다! hooks를 쓰면 간단하게 redux를 사용할 수 있습니다.
import React, { useEffect } from "react";
import { useSelector, useDispatch } from "react-redux";

import { RootState } from "../../modules";
import { getCheckSessionAsync } from "../../modules/test";

const TestComponent = () => {
  //store에 저장된 state는 useSelector를 이용하세요
  const { testObjectData } = useSelector((state: RootState) => state.test);

  //액션을 호출할 때는 useDispatch를 이용하세요
  const dispatch = useDispatch();
  const onGetCheckSession = (id: string) => {
    dispatch(getCheckSessionAsync.request(id));
  };

  return <div>...</div>;
};

export default TestComponent;
Result
프로젝트가 커질수록 비즈니스 로직이 점점 복잡해지고 그에 따라 개발자가 구현해야 하는 로직 또한 난도가 높아지고 있습니다. 특정 상황에서 특정 API를 취소시켜야 하는 로직을 구현해야 했고 그런 복잡한 로직들을 앞으로도 다양하게 구현해야 했기 때문에 saga뿐만 아니라 typescript 역시 같이 적용하였습니다.
redux-saga가 싱글톤 패턴의 state 관리를 위한 최선의 비동기 처리 미들웨어는 아닙니다. redux-observable 혹은 redux를 버리고 Mobx와 Observable로 가는 방법도 있습니다.
위의 기술들 혹은 최신의 기술이 최고의 기술이라고 생각하지는 않습니다. 본인의 개발 스타일과 프로젝트의 비즈니스 로직에 맞는 최적의 기술을 찾아보시길 바랍니다.